Introduction:
A while back I wrote up how I put three Nedis WIFIDS10WT smoke detectors onto Tasmota, ran them off a permanent supply instead of batteries, and pulled fire/test/mute/battery into Home Assistant over MQTT (the blakadder template does the heavy lifting). That got the hardware smart and talking – but living with it for a while turned up three things that bugged me. The kitchen detector would trip on cooking and then stay tripped in HA forever. The supply-voltage reading I’d added looked healthy but I had a nagging feeling it was lying. And if a detector had quietly died, nothing would have told me. This post is the tidy-up that turned it from “smart” into something I’d actually trust.
1. The alarm that wouldn’t clear
The downstairs unit lives near the kitchen, so every so often a bit of enthusiastic cooking sets it off. The sounder stops soon enough – but in Home Assistant the Fire and Mute states would latch ON and just sit there, days later, long after the kitchen had cleared.
The cause is a mix of two things. The blakadder rules publish the state with Tasmota’s publish2, which sets the MQTT retained flag – so “FIRE ON” gets stored on the broker. The detector’s Tuya MCU is supposed to send an “all clear” when the condition passes, but on these units it often doesn’t bother (the chip mostly wakes for events, not for the quiet afterwards). So the retained ON sits on the broker forever and HA faithfully shows it.
The fix that keeps the balance right is a small Tasmota timer rule: when a fire or mute event arrives it arms a timer, any fresh event re-arms it, and only once the chip has gone quiet for a few minutes does the device publish a retained OFF over the top:
Rule3
  ON TuyaReceived#CmndData=6A04000101 DO RuleTimer1 180 ENDON
  ON TuyaReceived#CmndData=6A04000102 DO RuleTimer1 180 ENDON
  ON TuyaReceived#CmndData=6A04000103 DO RuleTimer1 60 ENDON
  ON Rules#Timer=1 DO Backlog publish2 stat/%topic%/FIRE OFF; publish2 stat/%topic%/TEST OFF; publish2 stat/%topic%/MUTE OFF ENDON
Rule3 1
A genuine fire keeps sending updates, which keep re-arming the timer, so it never silences a real event – it just clears the latch once things are actually quiet. I deliberately left the battery/supply warning out of the auto-clear: on a mains-fed unit a low-supply flag should stay put until I’ve looked at it. I also added a manual “Reset” button per detector in Home Assistant as a belt-and-braces override.
2. The voltage readings that were lying
This is the one that taught me a lesson. I wanted the supply voltage of each detector in HA so I’d see a failing PSU coming. Two of the three showed a nice steady reading and one showed nothing, so I assumed two were fine and one needed fixing.
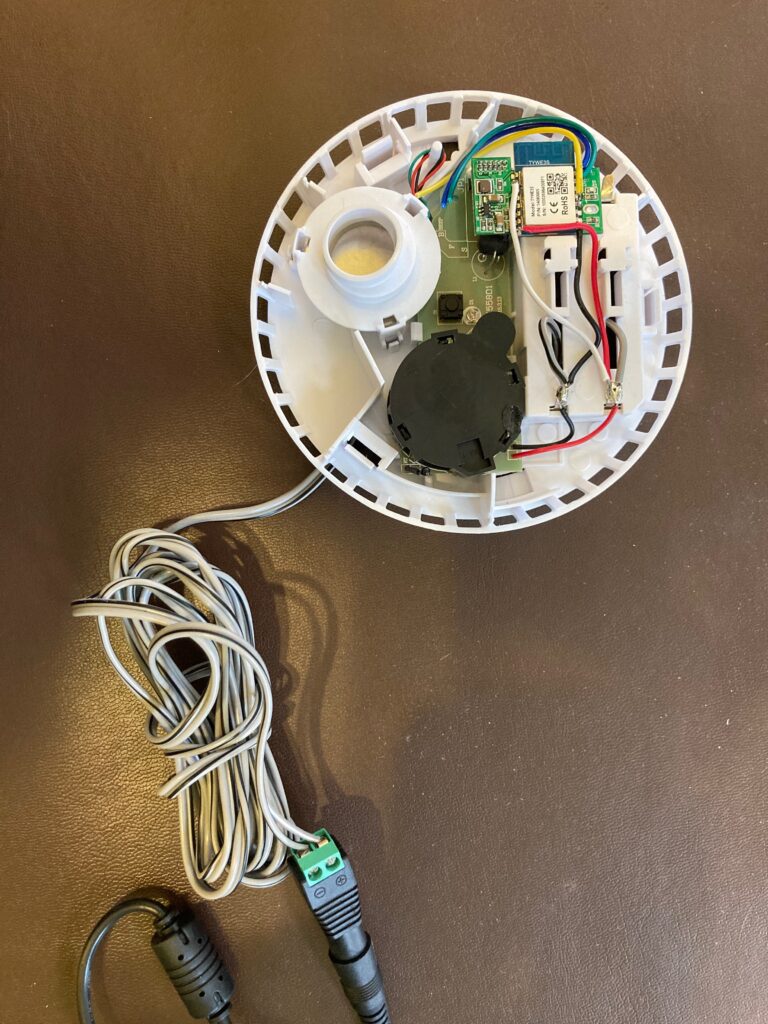
It was exactly backwards. The two “healthy” ones were reading a value pinned at 1024 – the ADC clamped at full scale, not measuring anything. The ESP8266 hidden inside the TYWE3S has an analogue input that only spans 0–1 V, and I’d wired a ~3 V rail straight at it, so it just sat at maximum and would only ever move once the supply had already collapsed. As a health monitor it was a green light that could never turn red. The third unit, meanwhile, had its ADC pin unconfigured and the wire floating – which is why it showed a wandering, meaningless number.
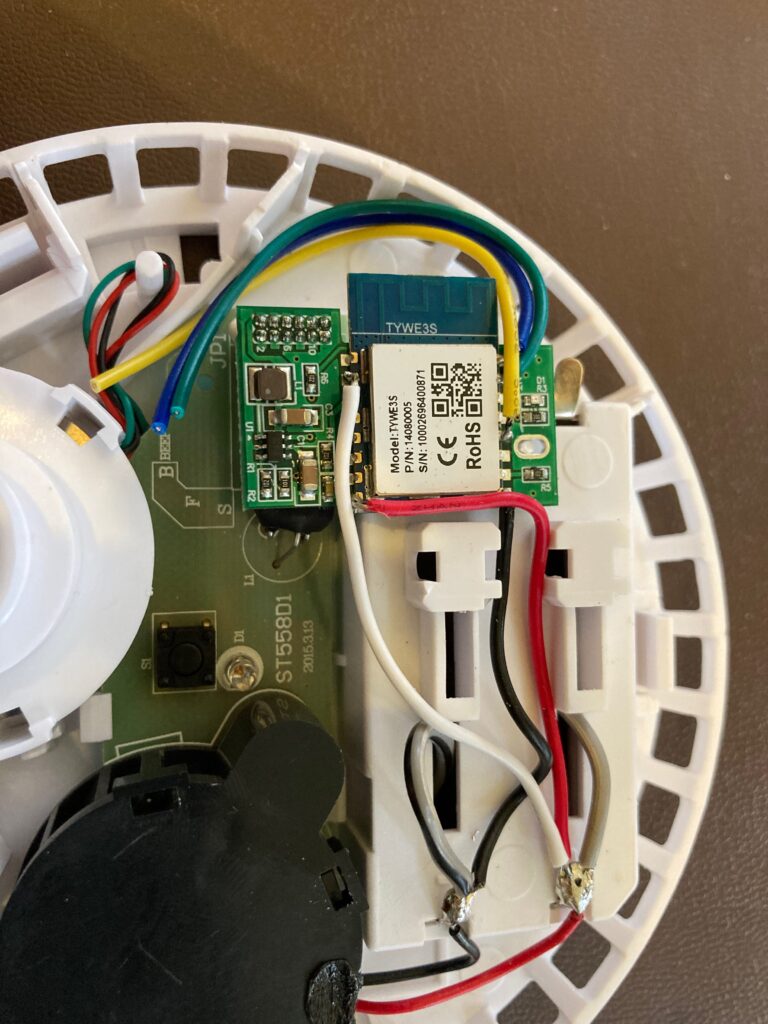
The proper fix is a two-resistor divider inside each unit – 330 kΩ from the supply rail to the ADC pin, 100 kΩ from the pin to ground (a 100 nF cap across the lower resistor if the reading jitters). That scales a ~3 V rail down to about 0.7 V, comfortably inside range with headroom to spot the supply drifting high or low. Ten minutes with a soldering iron per unit. After that the numbers actually mean something: measure the rail once with a multimeter, work out the millivolts-per-count (mine came out around 4.14 mV/count, two independently-built dividers agreeing to within a fraction of a percent), and turn the raw count into volts with a template sensor in Home Assistant:
{{ (states('sensor.smoke_downstairs_adc') | float * 0.00414) | round(2) }}Now all three read a believable ~3.8 V and I can put a genuine low-supply alert on them. Lesson learned: a sensor that always reads the same “good” value isn’t reassuring – it’s suspicious.
3. Knowing when one goes dark
For a life-safety device this is arguably the most important change of the lot. As set up, if a detector lost power or dropped off wifi, its Home Assistant entities simply froze at their last value – looking perfectly healthy while the thing was dead on the ceiling.
The cure is to give each detector an availability topic. Tasmota already publishes an LWT (“last will and testament”) message that flips to Offline when the device disappears, so it’s just a matter of adding that to the MQTT discovery config (I switched to Home Assistant’s abbreviated discovery keys to keep it within Tasmota’s rule size limit). Paired with an automation that pings me if any detector stays unavailable for more than ten minutes, a silently dead alarm is no longer possible.
4. Alerts that actually reach you
These three detectors aren’t acoustically interlinked – if the attic one goes off, you might not hear it downstairs. So Home Assistant effectively is the interlink. Now that the states are trustworthy, any Fire triggers a critical push notification to my phone that names which detector fired and is set to break through Do Not Disturb. The sounders themselves are plenty loud in the room they’re in; the notification is there to make sure the alert travels through the whole house and to my pocket.
A nice side effect: because I can see a mute press as a separate event, HA knows when a human has walked over and silenced a nuisance trip – so a bit of over-enthusiastic cooking doesn’t turn into a flurry of panicked phone alerts.
5. Logging the monthly test
Since I was formalising everything, the test button now earns its keep: an automation stamps the date each time a detector’s Test fires, and a gentle monthly nag reminds me if any unit hasn’t been pressed in a month. It turns “I really should test these” into logged evidence they actually work.
6. The dashboard
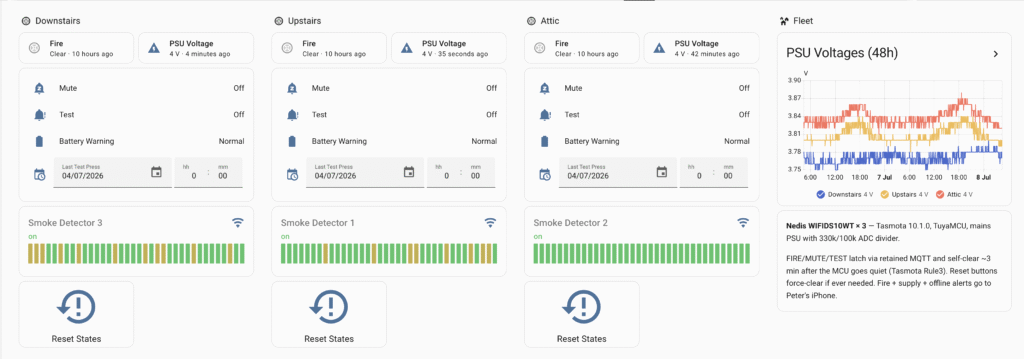
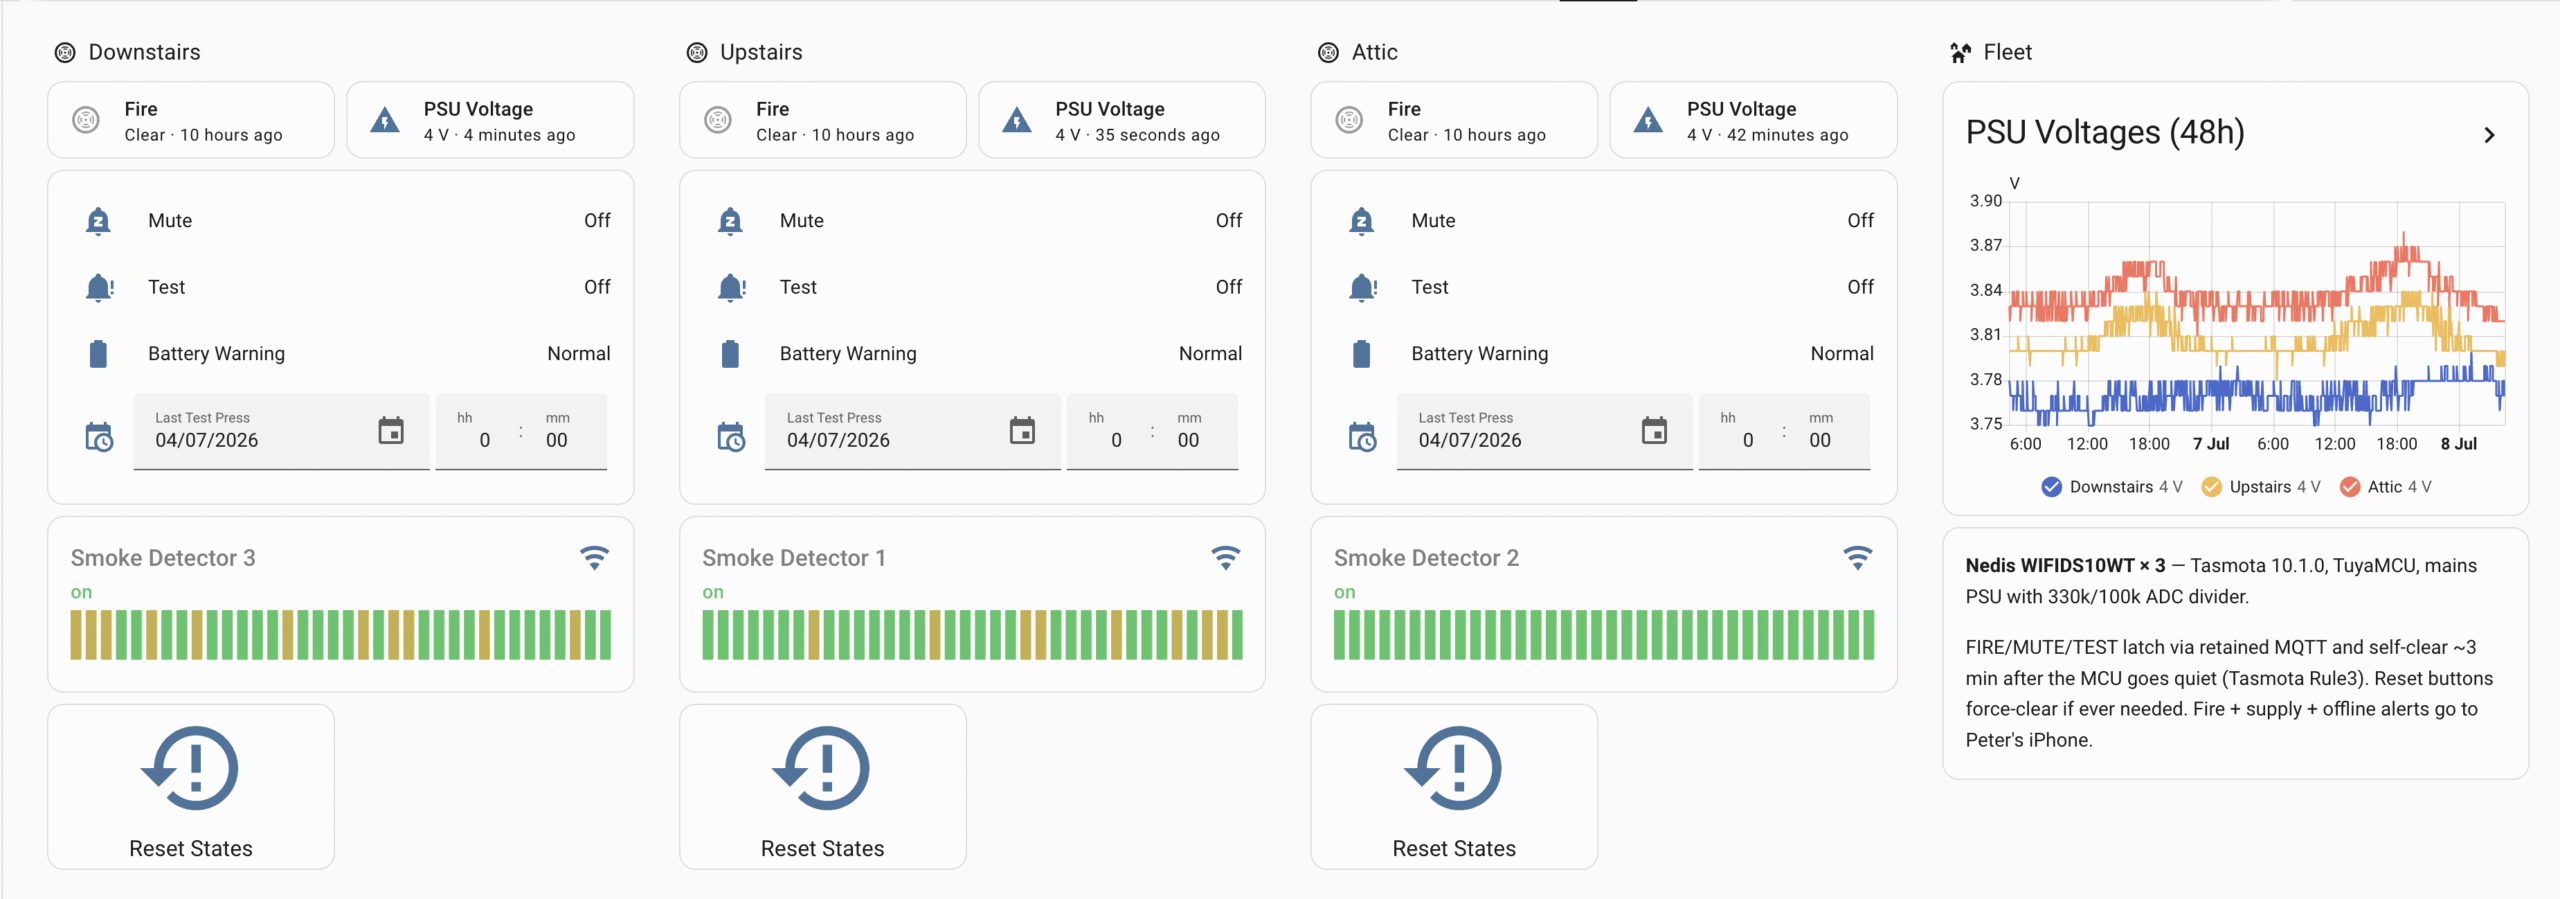
All of it comes together on a dedicated Smoke Alarms page in Home Assistant – one column per location (Downstairs, Upstairs, Attic) showing Fire, supply voltage, Mute, Test, Battery and the last test-press date, with an online-status strip underneath. A “Fleet” panel on the right graphs all three supply voltages together over 48 hours, which is exactly where a tired PSU would show itself first.
7. To upgrade Tasmota, or not
These are on Tasmota 10.1.0, which is a few years old now, and the tidy-minded part of me itched to bring all three up to date. I talked myself out of it, and I think rightly. Everything this build leans on – the Tuya events, rules, retained publishing, LWT, the ADC – is mature and stable on 10.1. Against that, updating from a version this old means stepping through a minimal build first, and a failed flash on a freshly-soldered, ceiling-mounted unit means ladder-and-serial-adapter recovery. They’re LAN-only devices behind the router, so the security case is weak too. If I ever hit an actual bug I’ll upgrade the easiest-to-reach one first as a guinea pig – but I won’t reflash all three in an evening just for neatness.
8. What I learned
- A too-steady sensor is a red flag. The voltage readings that looked perfect were the broken ones, clamped at full scale. If a value never moves, be suspicious before you’re reassured.
- Retained MQTT is a double-edged sword. Great for surviving restarts, but a retained “ON” that never gets cleared will haunt you – hence the auto-clear timer.
- For safety kit, “is it alive?” beats every other metric. Availability tracking was the highest-value change here, more than any pretty gauge.
- Don’t auto-clear everything. Fire and a low-supply warning are worth latching until a human acknowledges them; only the transient states should self-heal.
9. Where next
This was really phase one – get the hardware smart, get honest data into Home Assistant, and make it tell me when something’s wrong. The one that’s still more of a domestic problem than a technical one is the kitchen nuisance tripping; the sensible long-term answer there is a heat alarm rather than a smoke alarm right by the hob, which UK guidance actually recommends for exactly this reason. That, and adding my wife’s phone to the alert group, are the next little jobs. But as of now the fleet is measured, self-healing, and no longer capable of failing quietly – which for a smoke alarm is rather the whole point.